Use the correct attachment for the type of bulb to be changed.
Fits These Bulbs
Convient ces Ampoules
Se Adapta ess Bombillas
INSTRUCTIONS FOR USE
1. Always turn off electrical power to the bulb you are changing. Allow time for bulb
2. Select the appropriate attachment and screw onto the threaded end of the
extension pole. Hand-tighten the thumb-screw in the base of the attachment.
DO NOT OVER-TIGHTEN THE THUMB SCREW.
3. Extend the pole and tighten each section as shown on the diagram on the pole.
It is important to fully tighten each section so the pole doesn't loosen when
being turned.
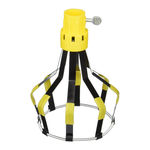
SPRING-CAGE ATTACHMENTS FOR FLOODLIGHT – STANDARD- CFL BULBS
Follow steps 2 & 3 above.
Slide the attachment onto floodlight bulbs by pushing it over the bulb from the
side. For standard bulbs push directly on the bulb. Turn the pole
counterclockwise to loosen and remove the bulb. Place new bulb in the
attachment and insert into socket. Turn the pole clockwise to tighten. Pull the
cage away from bulb.
Bulbs which have been too tightly installed may require initial removal by hand.
Using this light bulb changer after replacement will ensure easy removal in the
SUCTION-CUP ATTACHMENT FOR RECESSED FLOODLIGHTS
Follow steps 2 & 3 above.
Thread a long string through the eye on the base of the suction cup then tie the
string to the ear on the suction cup. String should be several feet longer than
the pole when fully extended. Gently, but firmly, push the cup onto the center of
bulb to form suction. (NOTE: Suction can be increased with a slight application
of moisture.) Turn pole counterclockwise to loosen bulb and carefully remove.
Bayco Products, Inc. • 640 South Sanden Blvd. • Wylie, TX 75098 • 1-800-233-2155 • www.baycoproducts.com
Press new bulb into suction cup. Carefully lift and screw bulb into socket. Pull
string to release suction.
BROKEN BULB REMOVAL – FITS REGULAR AND CANDELABRA BULBS
Turn off electricity at the source before removing bulb. Wear hand
and eye protection when handling broken glass and bulbs.
Attach extractor adaptor to extension pole, tighten
thumbscrew; do not over tighten. Choose suitable size extractor
(regular or candelabra) to fit base of broken bulb.
Position the tip of extractor over the glass filament of broken bulb. Gently push
upward and twist counter clockwise. Increase upward pressure if base binds.
Unscrew the broken bulb from the socket
This product is warranted to the original purchaser for one year from date of
purchase and covers failures due to defects in materials or workmanship. Keep your
proof of purchase.
NOT COVERED
The warranty does not cover normal wear and tear or cosmetic damage. The
warranty also does not cover damages which occurred in shipment or failures which
are caused by accidents, misuse and abuse. Consequential damages, incidental
damages or incidental expenses, including damage to property. Some states do not
allow the exclusion or limitation of incidental or consequential damages, so the
above limitation or exclusion may not apply to you. This warranty gives you specific
legal rights, which may vary from state to state.
WARRANTY CLAIMS - USA
Return the product to the place where purchased with a dated proof of purchase. Or
contact Bayco for USA warranty claims. Call 800-233-2155 and Bayco Customer
Service will provide a Return Goods Authorization (RGA) to facilitate rapid warranty
action. After receiving the RGA, send the product (shipping prepaid) to BAYCO
PRODUCTS, INC • 640 S. SANDEN BLVD • WYLIE, TEXAS • 75098. Include a
dated proof of purchase and a brief description of the defect with your name,
address and phone number. Your product will either be repaired or replaced at the
option of Bayco and returned as soon as practical, but no later than 45 days after
received by Bayco.
WARRANTY CLAIMS - CANADA
Return the product to the place where purchased with a dated proof of purchase
and a brief description of the defect with your name, address and phone number.
Your product will either be replaced or purchase price refunded.
REQUEST FOR WARRANTY ACTION
If you have any questions about this warranty or any other Bayco product inquiries
contact BAYCO PRODUCTS, INC • 640 S. SANDEN BLVD • WYLIE, TEXAS •
75098 or call 800-233-2155
AMPOULE INSTRUCTIONS CHANGEUR
Mdèles LBC-600, LBC-1600
RISQUE DE CHOC ÉLECTRIQUE: ne jamais utiliser le
changeur de lampe autour de câblage à découvert.
Porter des lunettes de sécurité lors du changement des ampoules.
Utilisez la fixation correcte pour le type d'ampoule à changer.
MODE D'EMPLOI
1. Toujours couper l'alimentation électrique de l'ampoule que vous modifiez.
Prévoyez du temps pour l'ampoule refroidir.
Sélectionnez la pièce jointe appropriée et visser sur l'extrémité filetée du pôle
d'extension. Serrez à la main le pouce-vis dans la base de l'attachement. NE
PAS Trop serrer la vis de pouce.